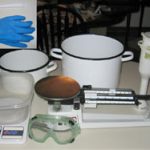
Step 1:
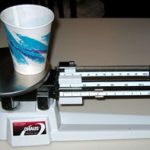
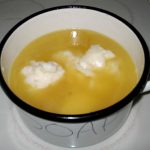
 Weigh Water Weigh the water. Having a scale that has a tear feature here will come in very handy. place the EMPTY container on the scale and “tear” it so the scale gets set to ZERO, then weigh you product. Otherwise, you will have to weigh the empty container first, and then subtract that weight from the total weight in order to know how much product you have added. It is important when making soap, that you make all measurements by weight, and not by volume. Different substances have different volumes at different temperatures. Weighing your substances is the only way to truly know how much there really is. Soap making is as much science as it is art, so please be sure to be as accurate as possible.
NOTE: As you will see in a bit, the lye reaction will make you water get very hot. To help with this, you may want to measure out half ice, and half water to help decrease cooling time.
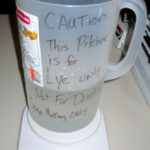
Your Pitcher should be labeled as mine is. LYE LYE LYE!!! It should have Caution written all over it, and the pitcher should never be used for ANYTHING except your lye water while making soap. It would be DISASTEROUS, and probably deadly if some one would accidentally take a drink from this pitcher. Always take every possible step in the interest of safety! |
Step 2:
 Weigh Lye Weigh the lye. place 2 paper cups (depending on how much Lye you need) on your scale and “tear” it to zero. Fill your cups with the necessary amount of lye, and proceed to the next step. if you are not ready to move on, don’t measure your lye yet. Lye is extremely reactive and will start absorbing moisture from the air if you leave it out. You can get Lye from a variety of sources. One is the supermarket. The most common brand of lye is sold under the name RED DEVIL. It will be with other drain cleaners such as Draino. ONLY USE PURE POWDERED LYE. Never use any other drain cleaner. It is recommended however that you buy lye from a chemical house or soap dealer as many lye manufacturers are no longer selling pure lye as a result of the recent uprising in “Meth Labs”
CAUTION: Lye is extremely caustic. It WILL burn you if you let it touch your skin. Protect work surfaces, and NEVER handle lye without the use of rubber gloves and safety goggles. It is not worth burning yourself, or loosing your vision. SAFETY FIRST!!! |
Step 3:
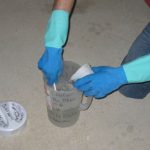 Mixing Lye Mix in the lye. This should be done in a well ventilated area, preferably outdoors. With gloves and safety goggles on, Slowly pour the lye into your water while briskly (but gently) stirring water. Be careful not to splash the solution or breath in the fumes. This step should not be rushed. You need to be sure the lye is completely mixed into the water so no lye deposits are left sitting on the bottom of the pitcher. When the lye is completely added, cover the pitcher with a fitted lid, and allow the mixture to cool.
NOTE: Adding lye to water creates an exothermic reaction, meaning it gets really hot! The water in many cases will even boil for a moment.
CAUTION: ALWAYS ADD THE LYE TO THE WATER! NOT VICE VERSA! If you add the water to the lye, it could result in a small explosion that will splash lye all over, and severely burn you.
Note: Even though I am not doing so in the photo, it is recommended that you wear long sleeves while making soap to avoid burns from splashing. |
Step 4:
 Weight Solid Oils Weigh your solid oils. This is where having the Ziploc containers comes in handy. They weigh next to nothing for their size, and allow you to weigh a large amount of oils on a scale that only goes up to five pounds. Place the Ziploc on the scale and “tear” it to zero, then add you solid oil scoop by scoop until the desired amount is in the container. As you weigh each solid oil, add the correctly weighed amount to the smaller of the two pots. Once they are added, begin to heat the oils on a VERY low heat. Stir every minute or two to prevent scorching the oils. |
Step 5:
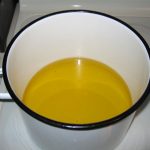 Melt Oils While your solids are melting, Begin weighing your liquid oils and add them to the larger pot. (When I weigh the liquids, I coat the container in Olive oil first BEFORE I tear the scale to zero. I do this because all of the oil never comes out of the ziploc container, and I feel that the extra oil in the ziploc from the beginning helps compensate for the oil you loose in transferring it to the pot). Add ALL liquid oils to the pot. |
Step 6:
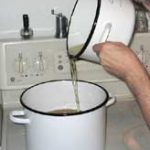 Mix Oils When the solid oils are all melted together, add the melted solids to the larger pot containing your liquid oils, and stir all oils so they are thoroughly blended. |
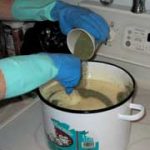
Step 7:
 Mixing in the lye
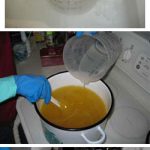
Once Lye has cooled, and Oils and Lye are at the same temperature (they should be between 100-125 deg.F in most cases) Begin to SLOWLY mix the lye solution into the oils. Stir the oils briskly, and stir in different patterns as you pour the lye solution in to ensure thorough mixing. From this point on, you do not want to stop stirring the mixture until it has “traced”. (what tracing looks like will be discussed in a moment) Once the lye solution has been incorporated into the oils, you can switch from the spatula to the stick blender. The Stick blender will help you reach trace in much less time. |
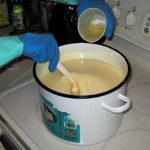
Step 8:
 Trace Lines As you stir the mixture, it will gradually thicken. When it gets to a point that you can stir it in a circle, stop stirring, and have the oils stop spinning within a second or so, your mixture is very near tracing. To test for tracing, remove your stirring utensil (the stick blender or spatula) from the mixture, and drizzle some of the mix over the surface. If it leaves a slight pattern, that is tracing. It will look like if you drizzled syrup over a bowl of syrup. the pattern will show, but it will disappear with a few seconds. When this happens, you are ready to add any scents or nutrients you would like, and pour the mixture into the mold.
(Photo isn’t the best, but you can kind of see the “trace” lines.) |
Step 9:
 Mix in nutrients Add nutrients. Briskly stir in any nutrients/exfolients you would like in your finished product. |
Step:10:
 Add Scents and Superfat Add your essential oils or Fragrance oils (if any) |
Step 11:
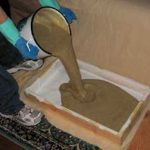 Pour Soap Pour your soap into the mold in one long solid pour, directly into the center of the mold. |
Step 12:
 Cover the Mold
Cover and Insulate your mold. Let it set undisturbed for 20-24 hours. This period is very important to the soap making process. Soap making is a science. The heat generated by the reaction between the fat and the sodium hydroxide (lye) is necessary to complete the process.
 Insulate the mold |
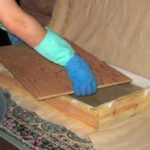
Step 13:
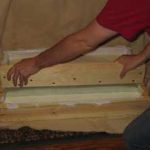 Cut the Soap Check on your soap. It should be firm, but not hard. Test it with your thumb. if you can leave an indentation in the top of the soap relatively easily, but it still feels good an firm, your soap is ready to cut. The most common way to cut soap is simply with a straight edge and knife. (please be very careful not to cut yourself doing it this way) My preferred way to cut soap is with a SOAP CUTTER. It’s a blade that is custom made for your mold. You simply line it up with your measuring marks on the mold, press down, and you have a straight clean cut. Please remember at this point your soap is still a bit caustic, so limit the amount of time you spend handling it with your bare hands. You certainly should NOT wash with it at this point. |
Step 14:
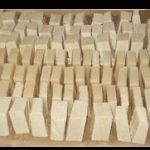 Soap Drying Now it is time to let your soap cure. this will take 4-6 weeks in most cases. During this time, stand your bars of soap on end in a well ventilated low dust area. If you have a dehumidifier, it will help, but is not necessary. Over the next 4-6 weeks, water will evaporate out of your soap, the PH will come down, it will get harder, and it will get milder. If your itching to try it after a few weeks, test it on your hands. if the soap feels slimy, you should give it a couple more weeks. Before you use it, you should test the PH of your soap. To do this, work a lather off a small bar, and rub the PH strip on the later. Then match the color to your test strips color chart. The PH should not be above 9.5 or so (is that the right number?) |
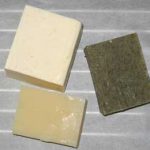 Finished Soaps That’s it! Enjoy your soap!
Clockwise from top left
Beeswax Castile, Wake-up Bar (Mint, Eucalyptus & Rosemary), Grapefruit w/lime & mint. |